


Introduction
When updating or switching phones, data transfer is essential. Most users worry about transferring contacts, photographs, and apps when switching to an iPhone or Android phone. If you know how to transfer data from one iPhone to another or from an iPhone to an Android phone, it might be easy to switch devices.
Dr.Fone App – Phone to Phone Transfer is a dependable solution to transfer data across iPhones and Android phones. This program makes transferring photographs, videos, and contacts safe and easy.
Let’s discuss how to transfer everything from one iPhone to another, how to transfer data from iPhone to Android, and other methods in this article. Let’s see why Dr. Fone App – Phone to Phone Transfer is great for fast, easy transfers.
Part 1: Introducing Dr.Fone App – Phone to Phone Transfer

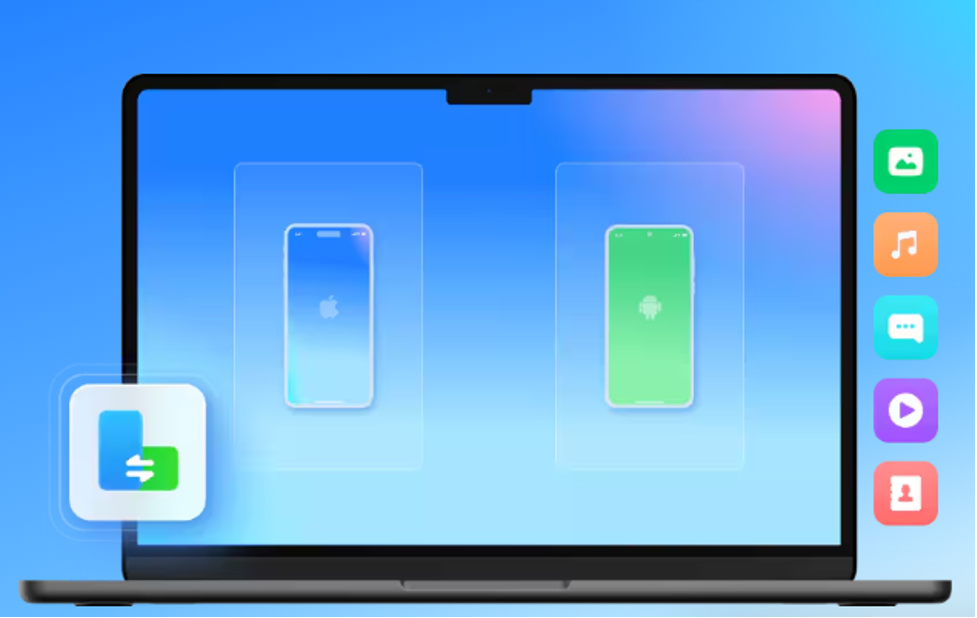
Dr.Fone App – Phone to Phone Transfer is a top-rated tool that offers a straightforward solution for how to transfer data from one iPhone to another or between different platforms. Whether you’re moving from iOS to Android or from Android to iOS, this app makes the process smooth and simple. You can also easily manage how to transfer data from iPhone to iPhone or between Android devices.
This app is very reliable and can handle many types of data, such as photos, videos, documents, contacts, music, messages, and more. It works with more than 6,000 different types of smartphones, so you can easily move files between devices. The best part? It does safe, lossless uploads, which means that your data stays safe and intact the whole time.
Here are Dr.Fone’s updated key features:
- Cross-Platform Transfers: Easily move data from your iPhone to your Android phone or from your Android phone to your iPhone. You can also move data between apps on the same platform.
- Multiple types of files can be opened: You can share documents, messages, photos, videos, music, and more to your friends. You can also open different types of files.
- Wide Range of Device Compatibility: It works with over 6,000 different types of smartphones.
- Safe and Lossless Transfer: There is no chance that your data will get lost or changed while it is being sent.
Dr.Fone is capable of transferring various types of data.
- Photos
- Videos
- Music
- Contacts
- Files
Part 2: How to Transfer Data from iPhone to iPhone/Android Phone Using Dr.Fone
It’s important to be able to transfer your data from one phone to another, especially when switching between iPhones and Androids. As we depend more and more on our phones for work and pleasure, it’s important to move important files like contacts, photos, and apps without losing anything.
An effective way to speed up this process is to use Dr.Fone. Its advanced features and easy-to-use interface make moving data between systems quick and easy. Dr.Fone – Phone to Phone Transfer makes it easy and quick to switch phones.
Step 1: Launch Dr.Fone and Select Transfer Mode
Open the Dr.Fone app and tap Transfer. Then, select Phone to Phone to start the process.

Step 2: Choose and Start the Transfer
Tap Send and choose the data you want to transfer, such as photos, videos, music, contacts, or files. You can also transfer data from other apps or iCloud.

Step 3: Send and Receive Data
A QR code will appear when you click Send. On the receiving phone, tap Receive and scan the code to connect both devices.

Step 4: Monitor and Complete the Transfer
Keep track of the transfer progress with real-time updates. Once the transfer is done, confirm on the receiving device.

Benefits of Using Dr.Fone for Data Transfer:
- Don’t bother with wires. You can wirelessly send and receive info between devices.
- There is no chance that any of your files will be lost during the move.
- You can start using your new device right away because the transfer process is quick.
Note: Don’t forget that Dr.Fone also comes in a PC version if you’d rather handle your transfers on a bigger screen or need to know how to transfer data from iPhone between devices that aren’t wireless.
Part 3: Other Common Methods for Transferring Data from iPhone to iPhone/Android Phones
Even though Dr.Fone App – Phone to Phone Transfer is great, you are able to transfer files in other ways. Let’s look at some of the most common alternatives.
Method 1- Transfer Data from iPhone to iPhone with iTunes or Finder
If you’re wondering how to transfer data from one iPhone to another, iTunes or Finder provides a simple solution.
Step 1: Start Your New iPhone
Turn on your new device and you’ll see the “Hello” screen. If it’s already set up, reset it to reach this stage.
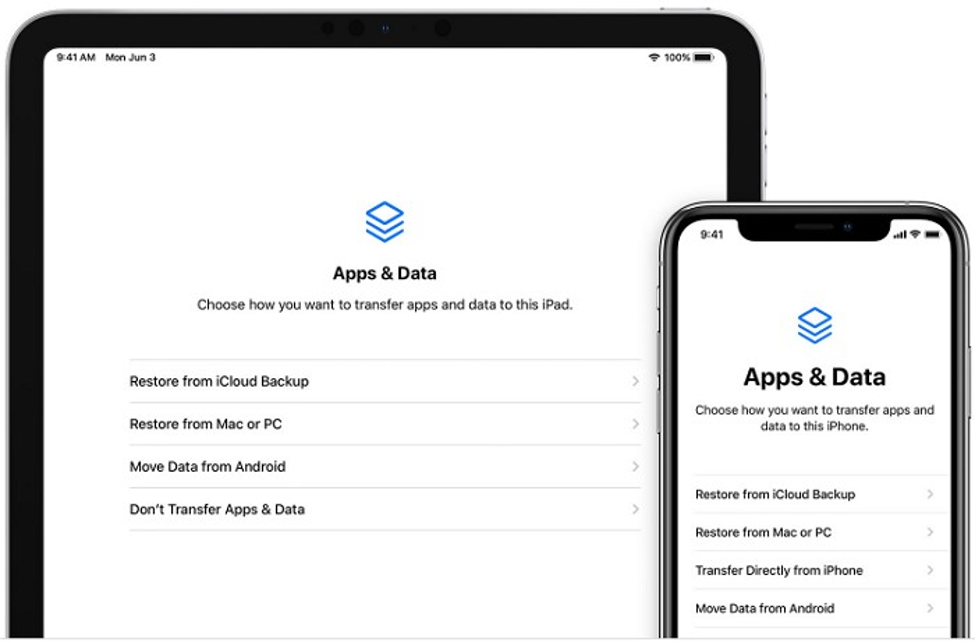
Step 2: Access the “Apps & Data” Screen
Follow the setup instructions until you see the “Apps & Data” screen. Choose “Restore from Mac or PC”.

Step 3: Connect to Your PC
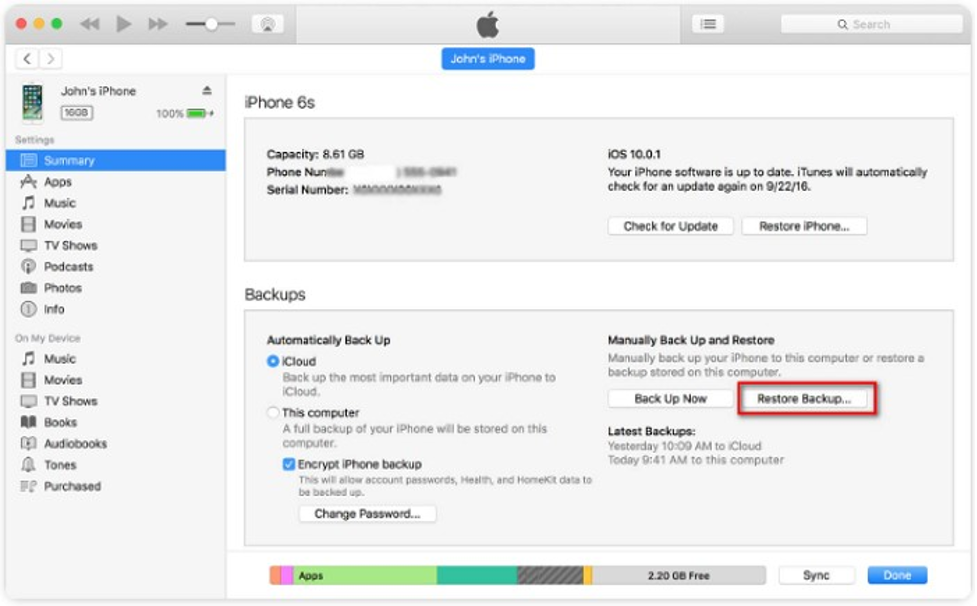
Using a cable, connect your new iPhone to the computer where your old iPhone’s backup is stored. Open iTunes or Finder and select your device.
Step 4: Restore Backup
Click on “Restore Backup” and choose the correct backup by looking at the date and size. If encrypted, enter your password.

Step 5: Complete the Setup
Wait for the restore process to finish, then complete any remaining steps to fully set up your new iPhone.
Method 2: How to Transfer Data from iPhone to iPhone Using iCloud
If you prefer to transfer data from iPhone to iPhone without a computer, iCloud is your best option.
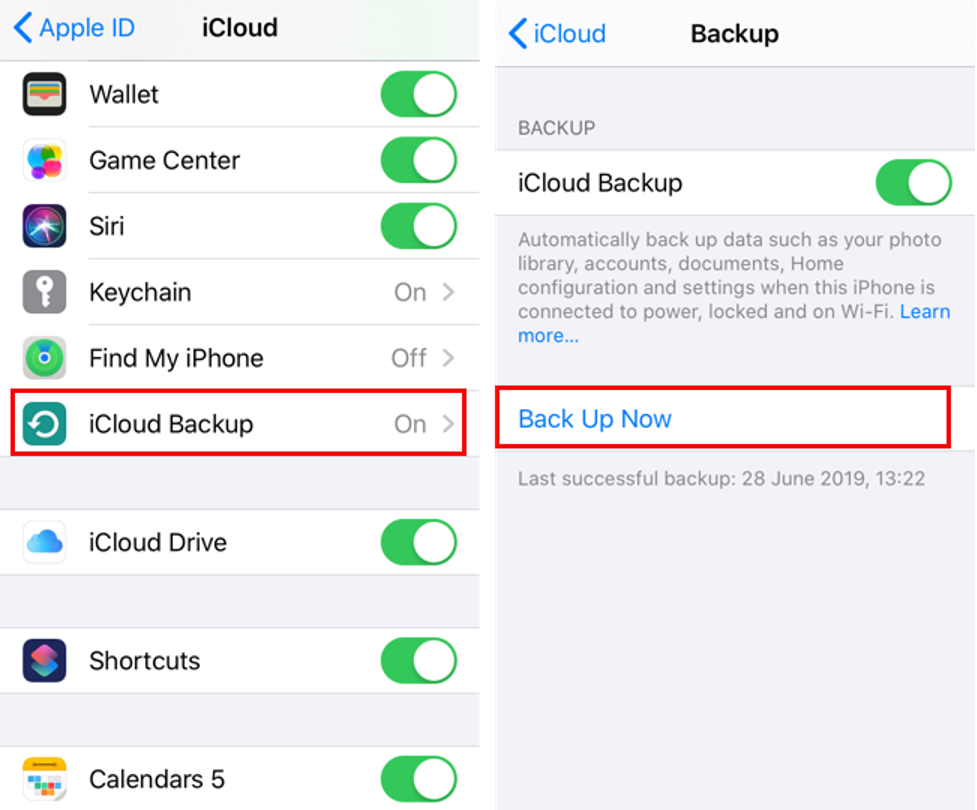
Step 1: Back Up Your Old iPhone to iCloud
Go to Settings then tap your name select iCloud and choose iCloud Backup After that tap Back Up Now to make a new backup

Step 2: Set Up Your New iPhone
Turn on your new iPhone and follow the on-screen setup steps until you reach the “Apps & Data” screen.
Step 3: Restore from iCloud Backup
Choose “Restore from iCloud Backup”, sign in to your iCloud account, and select the latest backup. Wait for the transfer to complete, and your data, apps, and settings will be on your new device.
Method 3: Switching from iPhone to Android? Here’s How to Transfer Your Data Using Google
If you’re switching from iPhone to Android or need to know how to move information from iPhone to Android, Google has made it easy. You can use your Google account to seamlessly transfer data.
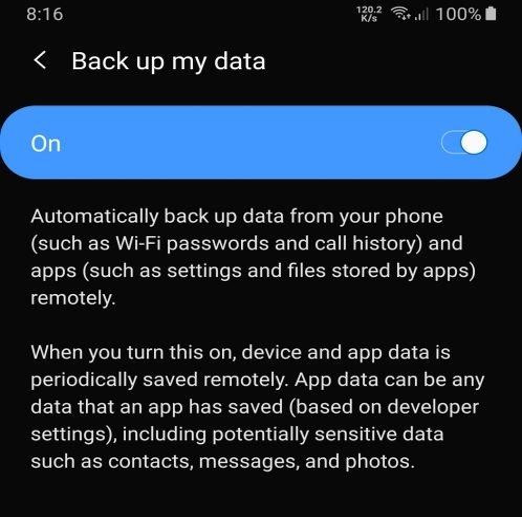
Step 1: Backup Your Data on Your Old Android Device
Go to Settings on your old Android phone, select Backup and Reset then choose Backup My Data. Turn it on so your data will be saved to Google Drive.

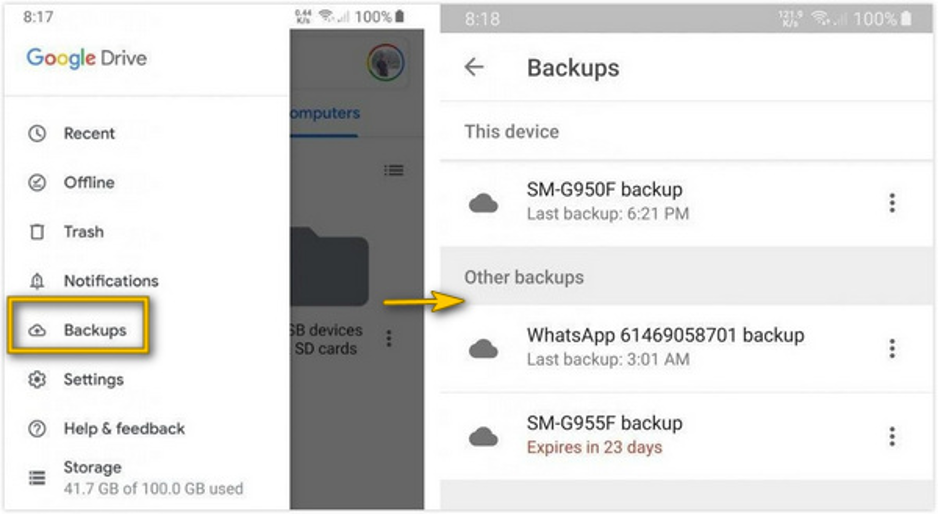
Step 2: Verify Backup
Check the Backup page for a folder named after your device. Ensure the most recent backup is there to avoid data loss.

Step 3: Restore Data on Your New Android
On your new Android, sign in with the same Google account. Choose “Restore from Backup” and all your data will be transferred to your new device.
Conclusion:
No more trouble transferring data from one iPhone to another or from an iPhone to an Android phone. Transferring from one platform to another or upgrading is a lot easier with the Dr.Fone App – Phone to Phone Transfer.
So, all of your important data, like photos, contacts, and apps, will be sent quickly and safely, without you needing to know much about technology. Cross-platform support means that both Apple and Android users can use it. Since most of the time, the gadget is wireless, it works well on any device.
With the Dr.Fone App – Phone to Phone Transfer, you can be sure that the next time you want to move data from your iPhone, it will be easy and quick. Download the app right now for a quick and easy fix.
Don’t forget to check out the PC version of Dr.Fone App-Phone to Phone Transfer to see what other choices you have for transporting your data.